Brisket Made Easy for Beginners
45sDirectly addresses beginner intimidation with a promise of simplicity, making it highly relatable and shareable.
▶ Play ClipThis video provides a step-by-step guide to smoking a beginner-friendly brisket using a pellet smoker and a simple Central Texas-style rub of salt and pepper. The host, from the 'doll father's BBQ' YouTube channel, demonstrates the entire process from trimming and seasoning to smoking, wrapping, and slicing for tenderness.
The video aims to teach beginners how to make an excellent brisket, emphasizing simplicity and ease.
A simple rub of 4 parts coarse ground black pepper to 1 part kosher salt (4:1 ratio) is used for a classic Central Texas flavor.
A small amount of mustard is used as a binder to help the rub adhere to the brisket.
Sprinkle the rub from a height for even coverage, then pat it in—never rub it onto the meat.
A Yoder pellet smoker is used with a smoke tube filled with Post Oak pellets to impart additional smoky flavor, mimicking a stick burner.
The first two hours are at 225°F to maximize smoke absorption. Then the temp is raised to 250°F.
Place the brisket fat side down to protect the meat from the heat source at the bottom of the pellet smoker, preventing drying out.
At around 4-5 hours, check the color. Spritz with water if the brisket looks dry. Use a crumpled aluminum foil ball under the brisket if juices are pooling.
When the brisket reaches 160-165°F (thermal stall) and has good color, wrap it in butcher paper to retain moisture while preserving a crispy bark.
After wrapping, raise the smoker temperature to 275°F and cook until the brisket is tender, probing for a 'hot knife through butter' feel (about 2–2.5 hours more).
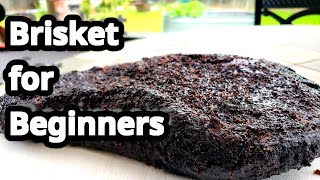
Once tender, remove the brisket from the smoker and let it rest until the internal temperature drops to about 150°F before slicing.
Separate the point from the flat. Slice the flat against the grain for tenderness. The host uses a 12-inch scalloped slicing knife.
The point's grain runs opposite; rotate 90 degrees and slice diagonally to ensure each piece includes bark. Serve as 'burnt ends'.
By following these simple steps—using a salt-and-pepper rub, controlling temperature, wrapping at the stall, and slicing correctly—beginners can achieve a tender, smoky brisket on a pellet smoker.
"The title accurately promises an easy brisket tutorial for beginners, and the video delivers exactly that with clear steps and tips."
What is the ratio of pepper to salt in a Central Texas-style rub?
4 parts pepper to 1 part salt.
0:57
Why do you pat the rub into the brisket instead of rubbing it?
Rubbing can cause the rub to smear and not adhere evenly.
2:20
What is the purpose of using a smoke tube in a pellet smoker?
To add extra smoke flavor, because pellet smokers produce less smoke than stick burners.
3:09
At what temperature do you start the brisket cook to maximize smoke?
225°F.
4:17
Why do you place the brisket fat side down on a pellet smoker?
To protect the meat from direct heat since the heat source is at the bottom.
5:13
What temperature indicates the thermal stall?
Around 150-165°F.
8:28
What is the recommended spritz solution?
A 1:1 ratio of apple cider vinegar and apple juice, or just water.
8:56
What do you do if there is pooled liquid on top of the brisket during the cook?
Use a crumpled aluminum foil ball to prop up the brisket and allow juices to run off.
9:41
Why use butcher paper instead of aluminum foil for wrapping?
Butcher paper preserves a crunchier bark, while foil can soften it.
13:55
What internal temperature should the brisket reach before resting?
Around 190°F or higher, until it probes tender like 'hot knife through butter.'
15:04
How long should the brisket rest before slicing?
Until the internal temperature drops to about 150°F.
15:38
How do you slice the flat part of the brisket?
Against the grain to ensure tenderness.
16:14
Why rotate the point 90 degrees when slicing?
Because the grain runs the opposite direction in the point compared to the flat.
18:41
Simple Central Texas Rub
Shows beginners that a delicious brisket doesn't need complex spices—just 4:1 pepper to salt ratio.
0:57Smoke Tube for Pellet Grills
Provides a practical solution to get maximum smoke flavor on pellet smokers, a common issue for beginners.
3:09Fat Side Down on Pellet Smoker
Explains the heat source location demands fat side down to avoid drying out—counterintuitive for many.
5:13Foil Ball for Pooling Juices
Offers a simple fix for when brisket sits in its own juices, preventing steaming instead of smoking.
9:41Slicing the Point for Bark
Demonstrates how to cut the point diagonally so every piece has a bit of the crispy bark.
18:41[00:00] But today, I'm going to show you guys how to make an excellent brisket that's very easy
[00:17] for beginners. We're going to do it right here today on the Dog Father's BBQ YouTube channel. So you love eating smoked brisket, right?
[00:30] But you're kind of new to the BBQ game and you're kind of maybe intimidated, don't be. I'm going to show you today how to make an excellent brisket from your beginners out there. So, let's get into it.
[00:43] There are a lot of fantastic rubs out there that you can buy at your grocery stores or at your local BBQ shops or whatever, and I would encourage you to definitely get out there and try as many as you can and find out what you like best.
[00:56] For today's purposes and we're keeping it nice and simple for the beginner, we're going to do a central Texas style rub, which consists of just straight salt and pepper. But before we put this rub together, guys, hey, why don't you drop a comment down there
[01:09] and let me know what are the favorite rubs that you like to use on brisket? Maybe there's something not there I haven't tried before and maybe we can try it out. Alright, guys, so as I said, we're going to put this rub together and we are starting off
[01:24] with kosher salt. And the way that I do my central Texas rub is I'll start off with a 4-to-1 ratio and that's going to be four parts of pepper to one part of salt. So, we're going to get our one part of salt put in here and so this is going to be one tablespoon
[01:38] of kosher salt, and then I've got coarse ground black pepper here, so we're going to put in four tablespoons of coarse ground black pepper.
[01:54] And that pretty much is our rub for the day, you know, you just kind of toss that around and mix it up. And now you have a good central Texas style rub to put on our brisket. Alright, so we're going to go ahead and get our binder put on and all you want to do is
[02:09] just apply a little bit of mustard there. So we just got a little strip of mustard, we're just going to rub it all over this brisket, get it nicely coated all over. And so now we're going to go ahead and apply our rub.
[02:22] We just want to sprinkle hot so that you get a good even coating all over the brisket.
[02:34] And then you want to pat it in, never rub your brisket guys, just pat it in. We're going to get a good even coating all over.
[02:47] Now that we got this side coated with our rub, we're going to flip it over and do the same thing on the other side. Alright, we're going to be using our pellet smoker today.
[03:11] I give a lot of requests about, you know, cooking on the pellet smoker. A lot of beginners out there are using, you know, various pellet smokers and have a lot of the inquiries. And so that's what we're aiming to do today is show you guys how to smoke a central
[03:23] Texas style brisket on a pellet smoker. It should be very simple and easy. But before we get this thing put on, let's talk about this for a second because we already know we're not going to get the same exact flavor if we were using a stick burner.
[03:36] You know, when I run my LSG offset, so how are we going to try and get as much smoke into this thing? Well, we're going to use a smoke tube. So if you guys haven't used a smoke tube before, I would say that's probably a good accessory
[03:50] to purchase for your pellet smoker. You'll basically just fill it up with your pellets. You'll light it, let it burn, let it burn until the flame goes out on its own.
[04:02] And at that point, it's just going to produce a lot of good, solid smoke for you. So I would strongly urge you to pick up a smoke tube and put that in your pellet smoker when you put your brisket on or any barbecue if you want that added additional smoke flavor.
[04:17] So we're going to go ahead and get this thing going. We're going to roll it at 225 for the first couple of hours of this cook because again, we're trying to get as much smoke into this meat as we possibly can on the front end of this cook. So let's get this brisket put on the yoder, all right?
[04:30] Let's do it. All right guys, so hey, we're at the yoder. We got this thing started up, but I wanted to make sure I mentioned to you. When you're starting up your yoder, you want to make sure that you have plenty of pellets.
[04:42] Today we're going to be smoking with post oak. There's plenty of choices out there. You can go with hickory, you can go with post oak, you can go with pecan, mesquite, apple, alder. There's tons of different pellets out there.
[04:55] So you find the pellet that you like the best for whatever protein you're cooking. Today we're going to be using post oak. So we've got our hopper full of post oak pellets. We've got our smoke tube in and it's smoking away.
[05:09] And now let's get this brisket on the pit, okay? All right guys, we got the brisket here. You'll notice this is meat side here, fat side on this side, and we're going to put it fat
[05:21] side down. We're going fat side down because the heat source from this pellet smoker is at the bottom. You have your deflector plate down here that's going to radiate heat up. You want that fat between your meat and your heat source just to protect your meat so
[05:37] it doesn't dry out. Also, I happen to know that the right side of my odour is going to burn a little bit hotter than the left side so I put my moist part. This is the point.
[05:49] I'll put the point facing towards this side of the pit as I put it on. We've got it right there in the center and we're now good to go. We can close this thing up and we can smoke it away.
[06:08] All right guys, so hey, we just got our brisket put on our yoder wire 640. It's smoking away with the post-op pellets. Everything is gravy.
[06:20] Now what do we do? Well, tell you what, what we're going to do is we're going to come back in two hours. We're running this at 2.25 right now and we have a smoke pellet tube in there so that we can get maximum smoke right now.
[06:32] So we don't want to cook this thing at a higher temperature right now. So we're going to go with 2.25. You can go 200 if you want, but 2.25 seems to be a good number for me. So what we're going to do is let this thing smoke away.
[06:44] We're going to smoke for two hours and we'll come back and check it at that point. First check, when again guys, two hours. See that.
[06:56] All right, you can see we're coming along here guys. We're just checking to make sure that our rub is set on our brisket. We're not quite set there. We're going to take our fingernail and just cut a rub and you can kind of see that rub is
[07:09] still kind of moving around a little bit so we're not quite there yet. But that's okay. It's just two hours into the cook. We're just getting that smoke flavor in.
[07:21] So we're just two hours into it and we got that smoke set into the brisket right now and we're all good. We've been cooking at 2.25 and now we're going to go ahead and raise our temperature up to 250 degrees for the next portion of this cook.
[07:36] We're going to come back again in two hours. We're going to check our brisket again at the two hour mark, which will be four hours total cooking time. And I'm expecting that our brisket, our rub, will be set by then.
[07:49] And then we can kind of pay attention to our next steps and make sure that we keep our brisket nice and moist throughout the cooking process. Again, we're at the two hour mark, our rub is not quite set yet. We're going to raise our temperature up from 2.25 to 250 and we'll be back in two hours,
[08:03] all right. Before we open up the grill, I just want to bring a couple of things to your attention that you want to think of before you open the grill because you want to do things rather quickly, okay.
[08:15] So what we're going to be looking for, number one, is going to be the color of our brisket. If we're where the color needs to be perfect, if not, we're going to let it keep rolling. If the color is where we need it to be, we'll do a temperature check.
[08:29] Temperature check is basically just because we want to see if we're somewhere around that 150, 160 range, maybe 165. That's when the thermostall kicks in. If you don't know about thermostall, there's plenty of articles out there for thermostall.
[08:41] I'll put a link down below so you can check that out, but it'll be time for us to decide if we're going to push through and leave this brisket completely unwrapped or if we're going to wrap it to push it through the thermostall.
[08:53] Secondly or third, we probably want to make sure we have our spritz together and what I have here is just a good little sprayer. You can spritz with what you like.
[09:05] Typically, people will likely use apple cider vinegar and apple juice, a one-to-one ratio today. I'm using just straight water. I don't happen to have any apple juice on hand.
[09:17] COVID-19 is keeping me at the house right now so I'm not going to venture out to go get any so we're just going to use straight water which I do very often. There's nothing wrong with it so feel free to use water to spritz your brisket if you like
[09:29] and you'll know that you need to spritz that brisket if you open it up and the brisket is looking rather dry in places, you want to go ahead and spritz it. So if it's actually looking at very wet and pooly, like there's a lot of pooled juices
[09:43] on your brisket, then you want to take some aluminum foil, crumple it up to make a little ball and set it under your brisket so that the juices will run off of the brisket, okay?
[09:55] Now last, how are we going to handle the brisket, the brisket is going to be hot. So how do we handle it? My man Alfredo Infante sent me over these Magnesium Gloves and basically these are the Magnesium
[10:10] Gloves guys. So they have a little magnetic clip on the gloves that allow it to stay together and stay together and you can put your fingers and put your hands in here and just like that you
[10:22] got the gloves on and you want to go take them off, you just put it together there and they come right off, very, very ingenious little invention of gloves. So I'll put the information down below so you guys can go check that out but we're going
[10:36] to be using our Magnesium Gloves to handle this hot brisket. So for our check here, we're right on it, so let's go ahead and check this brisket and see what we need to do to it, all right guys? Let's go.
[10:48] All right, as you guys can see the brisket is looking pretty good, it's got a good color to it. We're a little, a little kind of red there, you can see here and a little dry, we've got
[11:03] a little bit of pool in here on the back end, not too concerned about that, everything is looking pretty good, so we're going to spritz it and again we're spritzing with just water
[11:15] here, a little spritzing all over this brisket, I'm not quite happy with the color so we're going to keep it going here and that's going to do it, we'll close it up, all right so
[11:34] hey we're not quite where we want this brisket to be just yet but again we're only four hours into this cook, we just want to head moisturize it with a little spritz of water on it just now, and we're just going to let it keep going now, so we're probably going to check
[11:46] back here in the next hour, so that'll be a five hour point, this is a smaller brisket, so I'm anticipating that it's going to be cooking a little faster than say a big, you know, 14, 15 pound brisket, after we've trimmed this one, this one is roughly down to about eight
[12:01] and a half, nine pounds, so it's a rather smaller brisket, so again we're going to check back in in one hour guys, all right guys so we're at the five and a half hour mart, we're going to take a look, and everything's looking really good on this brisket, got a little bit
[12:19] of moisture here, this pooling, the color looks good, so we're going to go ahead and get this brisket wrapped, okay guys so we got our brisket off here, this is the fat cap side
[12:31] and this is the meat side, and so what we're going to do is we're going to put this in our paper, we're going to put it meat side down, and we're going to make sure that when we finish this wrap that this is going to maintain, meat down fat cap up, so just like that we've
[12:53] got this brisket wrapped again, we've got fat cap up, meat side is going to be down and we're going to place it back on our smoker, all right so we just got our brisket wrapped
[13:09] and we just got to put back on and we were going to wrap it because we already got the color that we're looking for, that brisket measured out to be about 168 degrees, which is right there at the thermal stall, so I know that we're good to go with going ahead
[13:22] and wrapping, now if you decide you don't want to wrap your brisket, you want to just cook it on the smoker the whole time, go for it, it's going to take a little bit longer, you're probably going to add a couple maybe three hours to your cooked time, but hey if you got nothing
[13:34] but time and you're willing to do it, go for it, it's a great brisket just as well, but we're going to wrap it and we're wrapping it in our butcher paper because I like to have a little bit more of a firmness to my bark, aluminum foil, it does a great job, but you pretty
[13:48] much lose the hard bark that you're looking for, at least I'm looking for because I like a little crunchy or bark, so we did, when I had wrapped it in butcher paper, we got it back on and we've now raised our temperature to 275 degrees, we're going to come back and
[14:02] we're going to start probing for tenderness here probably in about two to two and a half hours, so we're going to come back to two and a half hours, we'll start probing the meat just to see how it feels, because at this point we're not looking for temperature, the meat's
[14:15] already edible, I mean it's already past that temperature that is edible, but it's not going to be as tender as we want, so we're going to go for tenderness now, so I'll meet you back here at the yoder here in about two to two and a half hours, alright guys so roughly
[14:28] we're about seven and a half hours into this cook and we're going to start checking our tenderness, so I'm going to show you how we're going to do that right now, okay, I'm going to be using my thermokin to do this, but you can use whatever thermometer you're using,
[14:41] but basically what I'm going to do is I'm going to insert the side of the brisket here, and I'm going to push in, and I'm just kind of poking around to kind of feel how this brisket feels, you want it to be to where it feels like a hot knife point in butter, this is not
[14:56] feeling too bad, but it's not all the way there, so I'm going back here towards the point, and again it feels pretty good, but it's still not as tender as I want it to be, just as a side note,
[15:10] I don't know if you guys can see this, but the temperature is at 190.5 right now, so I know we still got a little ways to go, so we're going to close this grill back up and let it keep going and we'll check back here in about another hour.
[15:33] All right, so we just got our brisket off of the Yoder Y640 pellet smoker, we hit the 10 enters that we were looking for, it took up roughly about two hours or so, and we've got it off,
[15:49] we've let it rest, we let that temperature drop down to about 150 degrees, and now it's going to be time to go ahead and slice up this brisket, so let's go ahead and get this out of the butcher paper and let's get this brisket sliced up.
[16:15] All right guys, we're going to go ahead and get this brisket cut, I'm going to be using a Victorian ox 12 inch, this is a scalloped slicing knife, and so that's where we're going to be using the sliced brisket with, so let's get this brisket sliced up. Okay, so when I get ready to
[16:30] slice up this brisket, you notice I've got the flat ends going to be right here, my point's going to be right here, and what I'm going to do is I'm going to slice this brisket right down the middle, which is going to be closer to where the point's going to start, so we're going to get the cut right
[16:44] there, and then I'm going to take this point, as you can see here, we're going to put it face down on the board, now I'm going to turn my flat around, first give you a look at that,
[17:01] that's what our cut is looking like so far, but we're now going to start slicing from this end.
[17:23] Now, whenever you're going to get ready to pause slicing for a minute, take this meat cut side, put it right down on your board, and that'll help it to stop from oxidizing once you make that
[17:37] an initial cut, and I'm doing that so we can talk about this brisket that we have here, so as you can see here, I did cut this a little on the thick side, but you can see how that thing folds over and this is ready to fall apart for us,
[17:57] so we'll go ahead and give it a little slice there, and that's what we got guys, so we'll go ahead and give this a little taste,
[18:10] excellent brisket, very, very tender, the fat rendered out of this brisket, just like we wanted it to, so tell you what, again for you guys in the beginners at this,
[18:22] I'm going to go ahead and finish on you how to slice up the rest of this brisket, and we wrap this up, and then basically all the way across, so that's how you're going to slice up your flat.
[18:37] Okay guys, so now here we have left is our point, and the way you're going to slice that is you will not continue to slice like this because the grain runs in opposite direction, so you'll actually turn it 90 degrees, now the way that I do mine is I'll start here and I'll just basically circular
[18:54] that cut across, so the reason I do that is because everybody that gets a piece of this point will get some of the bark, so I'll start here, you just work my way all the way across here,
[19:21] and that's basically the way I cut it up, then you can just have your little pieces here,
[19:42] and as you can see every piece of that has some of the bark to it, all right? All right, so hopefully this guy's, hopefully this helps you, and I hope that you found
[19:57] some value in this video and these applications and techniques that I use, if you have, man please give me a thumbs up for the channel, and definitely subscribe, and it's come part of the dog app, be sure to follow me on Instagram and Facebook because I'll tell you when
[20:11] I post a lot of stuff on the scenes on my Instagram page and my Facebook, so a lot of the cooks that I do that don't make it on YouTube, you'll probably see a lot of that stuff on the Instagram page, so definitely follow me on Instagram and Facebook, I'll put a link up there so you
[20:25] can go check out a playlist and see some more of the content that I put on this channel, so it's been fun hanging out with you guys, but I've got to go, so tell you what, I'll see you guys in the next video, Baze!
[20:46] All right, so you love smoked brisket, but you're not quite sure how to make it just... All right, so you love smoked brisket, but you're not quite sure how to make it yourself, well tell
[21:06] you what, today I'm going to show you how to make the most. I'm going to show you some basic principles to smoking an excellent. I'm going to show you some basic principles to smoking here,
[21:24] I'll do four parts of pepper, as I spoke all over the freaking table. So again, two hour mark, our set, our open.
[21:39] These birds just don't want to quit. The bird's just disrespectful.
⚡ Saved you time reading this? Transcribe any YouTube video for free — no signup needed.