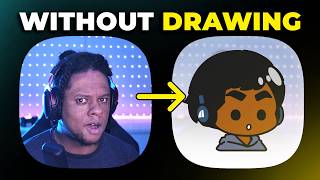

PNGtuber Without Drawing?
45sThe promise of creating a PNGtuber without drawing skills is a compelling hook for aspiring streamers.
▶ Play Clip"Delivers exactly what the title promises: a step-by-step guide to making a PNGtuber without drawing, with practical OBS setup."
The video is a tutorial on creating a PNGtuber avatar without drawing skills, using the website Charat.me and integrating it into OBS Studio with the Image Reaction plugin. The creator demonstrates how to customize a simple character, export it, and set up mouth animations and visual effects for live streaming or video content.
The creator introduces the idea of making a PNGtuber avatar using Charat.me, a website that allows creating simple character images without drawing skills.
Recommends going for the most simplistic style, with just a mouth open and mouth closed image, to keep it easy.
Shows how to customize skin color, eyebrows, and other features on Charat.me. The interface is intuitive and allows for various adjustments.
Explains how to set the initial face (e.g., smiling, neutral, or mad) that appears when not talking, and switch to a talking face when speaking.
Mentions adding expressions like disgusted talking for rant videos, and accessories like glasses, hats, and hoodies to personalize the character.
Suggests that a simple, relatable character is better than a complex anime model unless the audience is specifically into anime.
Shows how to add hand gestures and switch between different images to convey emotion, which is useful for video essays.
Acknowledges that paying an artist or learning to draw is the best course, but this method is a free alternative for those without budget.
Explains how to export the character images, noting that the high-quality download may require payment, but you can right-click and open image in a new tab to get the PNG without transparent background.
Demonstrates creating two versions: one with mouth closed and one with mouth open, by going back to the mouth section and changing it.
Explains the need for the Image Reaction plugin in OBS, which allows uploading a PNGtuber and switching images based on audio input.
Shows how to add a new Image Reaction source in OBS, select the mouth closed image for idle and mouth open for when sound is detected.
Tests the mouth animation by speaking, and suggests adjusting settings for smoothness.
Adds a Color Key filter to remove the background, selecting the screen color and picking the background color to make it transparent.
Mentions the Stroke Glow Shadow plugin to add outlines and shadows, and the Sharpen filter to improve image quality.
Shows how to add the PNGtuber to a scene and use the Shaderfilter plugin for effects like chroma UV distortion to make it look like floating.
Reminds that transparent downloads may cost money, but you can chroma key the background. Encourages finding an artist for best results, but this is a good free alternative.
The video provides a practical, free method to create a PNGtuber avatar using Charat.me and OBS Studio, with detailed steps for customization, export, and integration. While it emphasizes that paying an artist yields better results, it offers a viable DIY solution for content creators on a budget.
What website is used to create a PNGtuber avatar without drawing?
Charat.me
What are the two essential images needed for a basic PNGtuber?
One with mouth open and one with mouth closed.
00:14
What OBS plugin is required to animate the PNGtuber based on audio?
Image Reaction plugin
05:34
How can you get a transparent background without paying for the high-quality download?
Right-click the image and open in a new tab, then use chroma key in OBS to remove the background.
05:02
What filter is used to remove the background in OBS?
Color Key filter
07:03
What plugin adds stroke, glow, and shadow effects?
Stroke Glow Shadow plugin
07:32
What is the recommended approach for the best PNGtuber quality?
Pay an artist or learn to draw yourself.
03:47
Simplicity is key
Emphasizes that a simple character with just two mouth states is sufficient, making the process accessible to beginners.
00:14Best course is to pay an artist
Honest advice that while this method is free, professional results come from hiring an artist or learning to draw.
03:47Image Reaction plugin is essential
Identifies the key OBS plugin that enables mouth animation based on audio input, which is the core of a PNGtuber.
05:34Chroma key for transparency
Shows a workaround to get transparency without paying, by using the Color Key filter on a non-transparent PNG.
07:03[00:00] not really too sure if I want to show my face or not yet. Charat.me or Charat.me and create myself. little PNGtuber that people can look at when they're watching my videos.
[00:14] all types of styles I would really, really go for the most simplistic Not gonna lie, probably something like and just make it happen. You need one with the mouth open, one with the mouth closed and you're good to go.
[00:28] if you want to make it more complex, It is really, really, really easy. I haven't used this one in particular though.
[00:40] So you just pick whatever style fits the most and you're good. also this website has guidelines that allow you to use those for YouTube It usually super intuitive.
[00:56] On the left you can control the skin color. myself we're going to a little darker A little desaturated to. not gonna lie. Let put some eyebrows.
[01:11] On the OBS If you want your character to be, like, always smiling or not. basically the initial face before it speaks can be just, you know,
[01:26] Or, chillin, maybe kind of mad or maybe just like, it's like a slight smile like this. when you're talking, you want to switch to this smiling.
[01:43] kind of disgusted type of talking or. If you're making videos where you rant about stuff
[01:55] You can add all sorts of weird, not weird, but, you know, just extra stuff. Can I get a little bit of I don't like the way that looks.
[02:08] It's a tiny bit. Yeah. Okay. The facial hair is not really. Remember, if you don't like the style, there's a gazillion other styles, right?
[02:23] I'll just pick this one because I think it's better if you go super simplistic rather than the super advanced, like anime looking model or whatever. More people will relate to this than than people will relate to
[02:37] like a super detailed anime looking thing, Unless I don't know you cover anime You know, like your audience is going to be a lot of weebs. In that case, yeah. Go.
[02:49] No reason. You know what? I kind of like it like Glasses. We have the hat, sometimes I wear
[03:01] I also wear bucket hat, but I always Thanks for the color of that. I can with that. This is so cool!
[03:15] You can change whatever you're wearing. I like the extra detail on that hoodie is also cool. like video essays and you want sometimes a little hand to show up and be like, no
[03:31] You can add a lot of emotion by just switching out this, right? You're you're basically saving multiple images and then bow, bow, and I think it's important for me to say it, you somehow don't have a 25 bucks
[03:47] or a 50 bucks to pay an artist to actually make it for you or, you know, But I do want to make it clear that the best course for that kind of stuff is always to pay an artist or to learn how to draw yourself.
[04:02] and you're going to see it when we start exporting it that you're going to start learning how to how to draw and how to use a photo if I wanted to cut the hand out here and make it animated,
[04:20] in a photo editing software, But yeah, look at this is like pretty much made for for content creators, I'm not going to lie. If your live streamer, you could maybe use channel points or use like an advanced
[04:32] PNGtuber software in order to switch in between those things. switch in between modes and stuff would be perfect. But anyway, so keeping this video very simple, I believe finish is here.
[04:47] So there's high quality download but there's also regular download. Anyways, there's high quality download which will download it and We'll ask you to pay the two, which I haven't even tried.
[05:02] But if you right click on this one and you click Open Image a new tab, The only problem, quote unquote, is that you don't have a transparent background. But to be fair, we can go ahead and just added that.
[05:16] And I click on face and I go back to mouth, and this time my And then I click finish and I read click Open image a new tab. technically, I could put them in OBS studio and have them working.
[05:34] The most important thing here is that you need the plugin called Image Reaction. If I remember I'll put a link in the description OBS studio will have a source that lets you basically upload a PNGtuber.
[05:51] So what I'm going to do here is download those two. When you when you have the plugin installed. When you go to add a new source, you will have an image reaction source.
[06:04] This is kind of new. Okay, so image reaction. PNGtuber But you can add this and click Add new image reaction.
[06:20] And at the bottom image when sound. Let's go look for that And the bottom is mouth open okay.
[06:35] You can see mine is Mic/Auxiliary. And now when you talk you can of course. Baba baba baba baba baba baba baba
[06:48] bob bob bob bob bob bob bob bob Bob. There you go. Something like that. And you can make it a little smoother. spend like a couple minutes testing this and making sure that it works well.
[07:03] Of course it's not the best quality ever, although this is a 1440 screen, and we're going to add a couple of filters. First one is going to be color key Click okay we're going to go for color key
[07:18] type custom color select color and then pick Screen color. Click on that and then click on the background And just like that background.
[07:32] Really hone it in there's some other plugins Testing one two, For example, there's a plugin called Stroke Glow Shadow.
[07:44] It allows you to add those three things, and I can add And I can pick the color offset outline. You can see it on the right side there and it said the position to inner stroke.
[08:00] And I can always play around If I wanted to be a little sharper, there's also a sharpen.
[08:12] it looks a little sharper since, you know, it's a little low quality just your basic like unsharp and mask, super sharp, not super sharp just to make it a tiny little tiny bit less blurry.
[08:26] Maybe putting it before the color key can help. And I can add this as its own scene. If I click here, for example, I can click add one existing and it adds it there.
[08:43] Right now I can place it and I can just do my thing. I'm not going to go through all of them under the Shaderfilter plugin has. A chroma UV distortion shader which is going to go with you, but if we.
[09:00] Play with the amplitude. Then lower the amplitude. We should get to a point where it looks like it's kind of floating.
[09:12] Lower the chroma also. Looks like he's in water.
[09:24] That's much. And there you go. You can make content. As I said, play around with it.
[09:38] You will have to pay if you want to download some of the transparent ones. you can easily just change the background and then chroma key it in OBS multiple multiple different styles, a lot of accessories and all that.
[09:51] But of course, the main thing I want you to do is find an artist that you like, don't pay someone on Fiverr, or to use AI to do that stuff. Mostly because if you're not creative enough to do something
[10:06] that basic, you're not creative enough to prompt AI well enough for your thing to not think of AI after So yeah, have fun.
⚡ Saved you 0h 10m reading this? Transcribe any YouTube video for free — no signup needed.