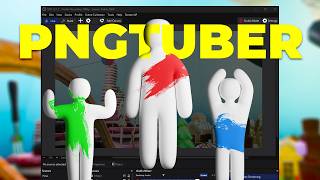

Turning a 3D model into a PNGtuber
44sThe process of downloading a high-poly model from a 3D printing site and importing it into 3D software is visually interesting and relatable to creators.
▶ Play Clip"Delivers a genuine tutorial with a unique twist, though the title oversells the 'Meccha Chameleon' specificity when the model is generic."
In this video, Gael Level demonstrates how to create a custom PNGtuber for OBS Studio using 3D models from 3D printing websites, with a unique twist: the character turns red when the streamer speaks, mimicking the end-of-round reveal in the game Mecha Million. The tutorial covers importing STL files, setting up lighting and materials, configuring OBS with audio-reactive filters, and even experimenting with displacement maps for advanced effects.
Gael gets the idea to create a PNGtuber based on Mecha Chameleon from the game Mecha Million. He finds 3D models on 3D printing websites like Sketchfab, but notes that many are not available for download, so he uses STL files from 3D printing sites.
He imports the STL files into his 3D software, initially seeing nothing until zooming out to find the models off to the side. He sets up a camera and adds a light to create shadows, adjusting intensity to 10,000 watts for visibility.
Gael renders the model with a red material to simulate the in-game reveal effect. He renders multiple images for different poses, saving them for use in OBS.
In OBS Studio, he adds two image sources: one with a white texture and one with the red texture. He uses a multiply blend mode to darken the white image, and adds a color correction filter to enhance the effect.
He adds an audio move filter (from the Move plugin) to the red image source, setting the action to change opacity based on microphone input. He adjusts the factor and easing to make the transition smooth.
Editor Gael Level explains that in Mecha Million, players are revealed glowing red at the end of each round, which is the effect being recreated.
He groups the two image sources and positions them as a PNGtuber. He demonstrates how to switch poses by double-clicking each source and selecting a different image, and mentions that with StreamerBot, poses could be automated via chat commands.
Gael attempts to use a displacement map with the Shader Tastic plugin to create a light-bending effect around the character. He exports a distortion map but finds the effect doesn't work as expected, concluding it needs more tweaking.
Gael successfully creates a functional PNGtuber with an audio-reactive red reveal effect, and shares the files in the description. While the advanced displacement map experiment didn't yield the desired result, the core tutorial provides a solid foundation for custom PNGtuber creation in OBS.
What type of files did Gael download for the 3D model?
STL files from 3D printing websites.
00:28
What blend mode did he use for the white image in OBS?
Multiply.
02:22
What plugin provides the audio move filter in OBS?
The Move plugin.
03:04
What setting did he change to make the red reveal smoother?
He increased the easing and lowered the factor.
03:59
What does the red glow represent in Mecha Million?
Players are revealed glowing red at the end of each round.
04:14
How can you switch poses in the PNGtuber?
Double-click each image source and select a different image.
04:41
What plugin did he use for the displacement map experiment?
Shader Tastic plugin.
05:47
Creative PNGtuber Idea
Combining a game's reveal mechanic with a streaming tool is a novel concept that adds engagement.
00:01Red Material Rendering
Shows a practical technique for creating themed visuals using 3D rendering.
01:41Audio Reactive Filter Setup
Demonstrates how to make a PNGtuber react to voice, a key feature for interactive streaming.
02:52Game Mechanic Explanation
Provides context for the effect, helping viewers understand the inspiration.
04:14Displacement Map Experiment
Shows the iterative process of trying advanced effects, even when they don't work perfectly.
05:47[00:01] popping off both on Steam, but also as content on social media. And as a content creator, this gave me a silly idea. So, I'm deciding to take you along with me for the journey. See, the first thing I needed was Mecha
[00:14] Chameleon 3D models. And on websites like Sketchfab, you can usually download models. Oh god, what is this? You can tell that this is like super high poly There you go, that's way better. But unfortunately, those are not for
[00:28] download. So, the only way to find those was is through 3D printing websites. So, let's download one of them. And we end up with a bunch of STL files. Now, the question is, can my 3D software open up STL files? Let's find out.
[00:45] import STL and I see something. Let's zoom in and I don't see anything. Let's zoom out. What happened? Oh, there they are. They were on the side. They were we're actually not going to do anything too fancy. I just want images. I mostly
[00:59] right, so from this view, I want to create a camera, bring it up a bit, check the camera view, and see what a render would look like. Right now, we completely gray. So, what I want to do is add a light that would create enough
[01:13] shadow to be visible. Bring that to the side and make sure it's bright enough. that it always tracks this guy. So, wherever I move it, or her or them. So, now if I go on the side, I can bring the light a little bit
[01:28] like this. I have snapping on. There you go, that's a little smoother. 10,000 watts, that's a lot. That's so much. Add more contrast like that. And uh that's pretty good. We're actually getting some bounce light here, which is more
[01:41] but hey, that's fine. So, if we go back to So, if I render this, what is it going to look like? Well, there you go. That's image and then I want to give it a red material. So, I'm going to preserve
[01:56] and make it red. We're going to render that, and save [music] it. And since I end of the video, I'm going to do it for the rest. And the two, [music] and three, and that one, too. And finally, this one. I'm also rendering this one,
[02:09] but this is for a test that we'll see later. So, here we are in OBS Studio, and I'll add two image sources. One for a white texture, just like that. And then another one for the red one, just like
[02:22] and we're going to start playing with this one. You could keep it like this. mode, and pick one that darkens. So, multiply good. What you can do to make the effect more pronounced is to go to filters, add
[02:39] a color correction filter, and play with the gamma, the contrast, etc. If you want it to be super dark, high contrast, lower gamma, you can see it more clearly that way. Now, one thing we're going to quickly do is add a color correction
[02:52] filter to the red one. Okay? Because we're actually going to be playing with the opacity. So, let's close that. And now, I'm going to find my microphone. I'm going to go to filters. And from there, we're going to add an
[03:04] audio move filter. Now, the audio move filter is from the move plugin that you can find by typing OBS move in Google, or just going to the OBS forums, and So, if you don't have the plugin installed, you will not have this
[03:18] installed, you will not have this filter. So, audio move. And where it says action, we're going to find setting. This will be from a filter. So, let's pick our source, which is the red image. Let's pick our filter, which is
[03:31] >> [laughter] >> You can see it's set to gamma right now. Let's pick s- the setting, which will be opacity. And just like that, factor, and make sure that we bring our gamma
[03:46] 50. 20. as you can see it's pretty jarring. You could keep it like that, but it doesn't really represent, you know, the end game uh reveal. So, we're going to bump up uh
[03:59] the easing quite a lot, and now it should be way softer, just like that. We might even lower the factor. Quick note from Editor Gael Level here. In case you've never seen or played the game, at the end of each round, players
[04:14] are revealed like that, glowing red, so you can see where they were hiding. Just a little bit, so now it's a little smoother, maybe 15. You want it to just hit that red. Test, test, [music] test, just like that. You can see how smooth
[04:26] it is, and also it won't be too distracting for your viewers. All right, place it. I'll just select both, right click, group selected objects, then click and drag to place it, and you can use it as a PNG tuber. Now, the huge
[04:41] advantage here is that if you want to switch poses, or even possibly let your chat control the poses, all you have to do is double click on each and choose the ones that you want. So, for the white one, right there, let me go find
[04:54] that one, click open, and as you can see, it got replaced. Let's do the same thing for the red, choose the right one, click open, and there, and it works. Now, if you use something like StreamerBot, you could
[05:07] probably make it automatic, maybe a chat command, an alert will change it the different poses during the whole time. The possibilities are absolutely endless, as I often say. So, there it is. My name is Gael Level, and I just
[05:22] created this PNG tuber, where when you speak, it becomes red, as if it was revealing it at the end of a Mecha Million match. I'm also providing those in the description. If you're not watching this on YouTube, or you're
[05:35] watch the full version, the link's in the description. this one, right there. So, basically I tried to export some sort of distortion
[05:47] map to see if I could make it so that light would kind of bend around it based going to work. I'll probably have to spend hours to make it work, but let's try it. So, there's a plugin called the Shader Tastic plugin. I have a video on
[06:00] that. And one of the options is to set up a distortion map or displacement map, if you will. So, I'm going to add our displacement image as its own source. probably going to be super stretched,
[06:14] filter, the Shader Tastic once you chose displacement map, it asked you to choose which source will be your displacement map. Ours is called Mac D. I mean I mean probably absolutely need to play around with it. Um it is on YUV. Let's check
[06:29] RGB. Oh god. Never mind, YUV it's going to be. Let's go ahead and turn off the actual image. It doesn't need to be on to have the effect. I'm going to lower And I'm going to tell you right now, this is not the effect I thought it was
[06:42] going to it was going to give. Yeah, that doesn't work. I'm going to have to play with this way more to figure it out. So, I re-exported it with better colors and there might be some potential. If we
[06:54] pair it this with the shadows, we might get something decent. Something like that. Eh, I don't know. There's no refraction on the the real ones. I just wanted to I don't know, have a little bit of shape to to to kind of make the
[07:07] light bend a little bit around it. And um it kind of works. It kind of works. sure you follow me on Twitch and I'll see you next time. see you next time. Peace.

⚡ Saved you 0h 08m reading this? Transcribe any YouTube video for free — no signup needed.