
Green screen setup is easier than you think
53sDebunks the myth that green screens require expensive gear, appealing to budget-conscious streamers.
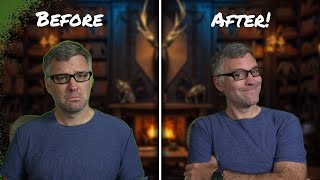
▶ Play Clip"The title is accurate; the video delivers a simple fix for improving OBS green screen quality."
This tutorial explains how to achieve a high-quality chroma key in OBS using a green screen, even with a typical streamer lighting setup and a decent webcam. The creator shares tips on selecting the right green screen, lighting, and camera, and demonstrates how to adjust OBS chroma key settings for optimal results. A cheat code using the Advanced Masks plugin is also revealed.
A pull-down or pop-up green screen is recommended over a simple green cloth because it avoids wrinkles and makes setup/teardown easier, leading to better chroma key results.
A typical streamer lighting setup with a bright key light on one side and a dimmer fill light on the other is sufficient. Shadows are acceptable if they are diffuse, as software can compensate.
Any decent webcam works, but cheap low-quality cameras may struggle due to lower color quality and more noise. The method works with a wide range of cameras from C920 to mirrorless.
The three key sliders are Similarity (range of green to key out), Smoothness (softens edges), and Spill Reduction (removes green cast). The goal is to keep Similarity as low as possible for better edge control.
Pick a mid-tone green from the screen rather than the brightest or darkest. This allows the Similarity slider to expand evenly, resulting in a cleaner key with lower Similarity values.
The Advanced Masks plugin (version 1.5.0) offers a chroma key with dual color selection (lightest and darkest green), making it easier to pick the correct range. It also includes a show mat option and a feather mask for fine-tuning edges.
With reasonable lighting, a flat green screen, and understanding of OBS chroma key settings, you can achieve professional-looking real-time special effects for your stream. The Advanced Masks plugin simplifies the process further.
What are the three key sliders in OBS Chroma Key?
Similarity, Smoothness, and Spill Reduction.
06:10
What does the Similarity slider control?
The range of green that will be keyed out; higher values key out a larger range of greens.
06:20
What is the recommended range for Smoothness?
Around 15 to 25.
08:18
What is the purpose of Spill Reduction?
To remove the green cast (spill) on the subject, especially on shoulders and hair.
07:41
What is the best color to pick when selecting the key color?
A mid-tone green, not the brightest or darkest.
09:21
What is the advantage of the Advanced Masks plugin's chroma key?
It allows selecting both the lightest and darkest green, making it easier to find the correct range.
12:21
What does the Feather Mask option do?
It blurs the edges of the mask, adding extra smoothing for more realism.
14:20
What type of green screen is recommended for best results?
A pull-down or pop-up green screen that is flat and wrinkle-free.
01:06
What lighting setup does the creator use?
A bright key light on the left and a dimmer fill light on the right.
03:38
What is the general rule of thumb for Similarity and Smoothness?
The lower the Similarity value, the more range you have to play with Smoothness.
07:23
Invest in a quality green screen
Emphasizes that a flat, wrinkle-free screen significantly improves chroma key results.
01:06Simple lighting setup works
Shows that professional lighting is not necessary; a typical streamer setup suffices.
03:38Pick mid-tone green for key color
A specific, actionable tip that dramatically improves key quality.
09:21Advanced Masks plugin cheat code
Provides a simpler method for color selection and additional fine-tuning tools.
11:45[00:00] viewers of my stream know that I love
[00:03] creating fun special effects to spice
[00:06] things up a bit. Now, one of the
[00:08] fundamental building blocks of those
[00:10] effects is a high quality chroma key
[00:13] using a green screen. And I know that
[00:16] setting up a green screen and a chroma
[00:18] key can seem a little bit daunting. Not
[00:20] only do you need the screen, but do you
[00:22] need studio quality lighting and a
[00:24] really good camera? And what's up with
[00:26] all the dials that you have to adjust in
[00:28] OBS? Well, I'm here to tell you it's
[00:31] actually not that complicated. With a
[00:35] typical streamer lighting setup, a
[00:37] decent webcam, and a green screen, you
[00:41] too can have an amazing chroma key on
[00:43] which to build your effects. I'm Finite
[00:46] Singularity, and today I'm going to show
[00:49] you how to set up a green screen that'll
[00:51] leave your viewers scratching their
[00:53] heads. But stick around to the end
[00:56] because I'm going to share with you a
[00:57] cheat code that'll make it even easier.
[01:02] [Music]
[01:06] Now, let's start by talking about the
[01:08] screen itself. You could see my green
[01:11] screen behind me, which is a pull down
[01:14] green screen mounted to my ceiling. Now,
[01:17] as streamers, we typically like to do
[01:20] things as inexpensively as possible. And
[01:23] a lot of tutorials will claim a good way
[01:25] to cut corners is on the green screen
[01:28] itself. They'll say things like, "Just
[01:30] get yourself some green cloth and throw
[01:32] it up on the wall behind you." And while
[01:35] this can work, it causes two big
[01:38] problems. The first is setup and tear
[01:42] down. You have to figure out a way to
[01:44] mount it to the wall. And when you mount
[01:46] it, you have to figure out how to iron
[01:48] out all the wrinkles that will appear
[01:51] every single time you put it up.
[01:55] Speaking of those wrinkles, that's the
[01:57] second problem. I've never had much luck
[02:00] ironing out all those wrinkles. And a
[02:03] smooth green screen like this one is
[02:06] much easier to chroma key, and you'll
[02:08] get significantly better results. So, if
[02:11] you're serious about wanting to make
[02:13] these sorts of effects on your stream, I
[02:16] would recommend investing a little bit
[02:18] more in a quality green screen. Uh,
[02:21] something like a pull down green screen
[02:23] or maybe one of those Elgato pop-up
[02:25] green screens. They don't wrinkle. They
[02:28] have a nice quality green color, and
[02:31] they set up and they tear down quite
[02:34] easily. And you'll find that you
[02:35] actually use them.
[02:37] [Music]
[02:42] A flat green screen is fantastic, but if
[02:45] you don't have any lights, you're going
[02:48] to have a bad day trying to key it out.
[02:50] Now, if you've spent any time watching
[02:52] tutorials on green screens on YouTube,
[02:56] super boring, I know. You'll hear
[02:58] lighting, lighting, lighting. And then
[03:01] you'll see studio setups with expensive
[03:03] lights for the green screen and separate
[03:05] systems dedicated to the subject. and
[03:07] you'll see roomsized green screens that
[03:10] are far away. And I don't know about
[03:11] you, but I don't have the room nor the
[03:14] money in my streaming space for that. My
[03:16] screen placement, it breaks all the
[03:19] rules. It's way too close to me. I don't
[03:22] have dedicated lights, and I don't know
[03:24] if you noticed, but there's shadows.
[03:28] However, if we can keep those shadows
[03:30] diffuse and we can reasonably limit
[03:33] them, we can easily make up for that in
[03:36] software. So, how do I get lighting like
[03:38] this? Well, frankly, by following every
[03:41] lighting suggestion for streamers on the
[03:44] internet. To my left and up high, I have
[03:47] a bright LCD panel key light. And to my
[03:51] right, I have a dimmer LCD panel fill
[03:55] light. And that's it. I'll leave some
[03:58] links in the description for streaming
[04:00] lighting setup. And so if you can set up
[04:03] like a typical stream lighting setup
[04:05] like this and you have a flat green
[04:07] screen, you'll get a great chroma key.
[04:16] The last piece of hardware we need to
[04:17] consider is the camera. Now, any decent
[04:21] webcam will work, although you might
[04:23] start to struggle with one of those
[04:24] cheap $5 webcams that you got for free
[04:28] at some conference. As lower-end
[04:30] cameras, they tend to have lower color
[04:32] quality, less chroma information, and a
[04:34] lot more noise, which makes keying much
[04:37] more difficult. I've had good luck on a
[04:40] wide range of webcams and cameras,
[04:42] including the classic C920,
[04:45] the Elgato Face Cam, my iPhone. I've
[04:48] also used this on like high-end
[04:50] mirrorless cameras. So, it's really
[04:52] applicable to a wide range of cameras.
[04:55] And as long as you're not trying to use
[04:57] an actual potato, this method should
[05:00] work well. And with that, let's dive
[05:03] into OBS and start the fun part,
[05:06] removing our background.
[05:10] [Music]
[05:15] Here we are in OBS. I've set up a simple
[05:18] scene of just my camera as well as a
[05:21] background image that we want to have
[05:23] show through our key. Go ahead and click
[05:26] on the camera and then on filters to
[05:28] bring up the filters menu for that
[05:30] source. This is where we'll apply our
[05:33] chroma key. Uh click the plus button and
[05:36] select chroma key. Uh once you click
[05:39] okay, you should see something similar
[05:42] to this. uh you'll have a chroma key
[05:45] using the default values and it likely
[05:48] won't look very good. This is because
[05:50] the green of your green screen likely
[05:53] does not match the default green
[05:56] provided by the filter. Uh to fix this,
[06:00] we'll go ahead and select a custom color
[06:03] for our key color type. Uh before we
[06:06] actually select a color though, I want
[06:08] to talk briefly about these three
[06:10] sliders. Uh these are the three
[06:13] important sliders for setting up our key
[06:15] and what we're going to go over today.
[06:17] Uh the first is similarity. Similarity
[06:20] is the range of green that you'll be
[06:24] able to key out. Higher values mean
[06:26] you're going to key out more light and
[06:28] more dark, a larger range. Smaller
[06:30] values mean you're going to focus in on
[06:32] very specific colors of green. If you
[06:34] had an absolutely perfect chroma key,
[06:36] you could set this value way, way down.
[06:39] But again, as streamers, we don't have
[06:41] the space. So, we cast shadows. We don't
[06:43] have professional lighting. We don't
[06:45] have dedicated lighting for our green
[06:46] screens. And so, we are going to have
[06:49] variance in that color. And so, we are
[06:51] going to need to have a similarity value
[06:54] that isn't one or two. That leads us to
[06:58] our smoothness value. One of the side
[07:00] effects of a chroma key is the edges of
[07:03] your subject can look rough or unnatural
[07:07] or noisy. Uh the smoothness slider,
[07:10] well, it smooths those out and allows
[07:13] the subject to blend a little bit more
[07:15] nicely into the background and look more
[07:18] natural. Now, smoothness and similarity
[07:21] are linked. Uh the general rule of thumb
[07:23] is the lower you can get your similarity
[07:26] value, the more range you have to play
[07:29] with your smoothness value. So if you
[07:32] can get that similarity value down low,
[07:34] it means you've got more ability to make
[07:37] your key look natural. Finally, we have
[07:41] key color spill reduction. One other
[07:44] thing that green screens do is they put
[07:46] a green cast on the subject. You'll
[07:50] notice this a lot of times in the
[07:51] shoulders, in the hair. You'll see like
[07:53] that green around someone when it's a
[07:56] pretty bad chroma key. Uh, spill
[07:58] reduction helps to fix this. It'll
[08:00] desaturate those greens around the
[08:03] edges. However, if you set it too high,
[08:06] it's going to desaturate your skin tones
[08:08] and it's not going to look real good.
[08:10] So, I found for spill reduction, I keep
[08:13] it under 100. Usually, I set it around
[08:15] 50. Uh, for my smoothness, I'm usually
[08:18] shooting for something around 15 to 25.
[08:22] And similarity, I find getting a key
[08:25] with a similarity under 80 can give a
[08:28] very nice key. Our first step now is
[08:30] we're going to select our key color. So,
[08:34] start by dialing these all down to one
[08:37] so that you can see your original
[08:39] background here. And go ahead and click
[08:42] select color. Move your color picker
[08:46] here off to the side a little bit
[08:47] because you need to be able to see. And
[08:48] click pick screen color. And this is
[08:51] somewhere where a lot of people mess up.
[08:54] Uh when they go to pick a color, you're
[08:56] going to just click on any green in your
[08:58] background. Here you can see the value
[09:00] changing. A lot of people zero in on
[09:02] like this really nice chroma green here,
[09:04] thinking, "Okay, I'm going to get that
[09:05] great chroma green, and that's what
[09:07] we're going to filter out." Other people
[09:09] might pick stuff like really close to
[09:11] their subject to try to get rid of that
[09:12] that haze around their subject. Other
[09:15] people might choose the darkest color.
[09:18] In fact, the best green to pick is, as
[09:21] the kids say, the mid green. You're
[09:24] looking for that green that's smack dab
[09:26] in the middle. So that when we expand
[09:28] that range, we're expanding from the
[09:31] middle to the outside versus having to
[09:33] expand from one side, you know, out. you
[09:36] you want to keep that value as low as
[09:38] possible. Uh so we're going to try to
[09:40] find sort of the middle shadow color
[09:42] here. I'm going to pick something about
[09:44] here. So I'm going to click there and
[09:46] then in my color picker here, click
[09:48] okay. You can kind of see some of the
[09:50] stuff that's getting filtered out cuz my
[09:51] similarity is low. Now the way we know
[09:53] we picked a good color, we'll start to
[09:56] increase similarity. And the goal is to
[09:58] have the lightest part, which is above
[09:59] my head here, disappear at the same time
[10:02] as the darkest part, which is down here.
[10:04] So clearly I picked a color that is
[10:07] quite a bit too light. You can see my
[10:10] similarities around 70. Uh so we're
[10:12] going to rinse and repeat here. I'm
[10:14] going to click select color. Uh we'll
[10:16] move this off to the side again. Pick
[10:18] screen color. And I'll pick a little bit
[10:20] darker green here. And we'll click okay.
[10:24] And again we'll try that. And now you
[10:27] see it's not perfect, but we're a lot
[10:30] closer. And our similarity value is down
[10:32] around 50 52. We we'll set it to about
[10:35] 55 here. Gives us a little bit extra
[10:38] room to work with. And if I move this
[10:40] out of the way, you can see we have a
[10:42] pretty good key without even doing any
[10:44] smoothness here. That picking that
[10:46] middle color makes a huge huge
[10:48] difference. I'm going to go ahead with
[10:51] my smoothness value. I'm going to bump
[10:53] that up to around I don't know 14 or so.
[10:56] And uh you know, you can see that it
[10:58] smooths out the edges just a little bit.
[11:00] If you do it too much, you'll find that
[11:02] you'll start to disappear. You'll start
[11:04] to turn into a ghost. Uh so yeah,
[11:07] something around 14 seems to work pretty
[11:09] well there. And even though I don't have
[11:11] much green cast on me right now, I
[11:14] always set my spill reduction to 50. I
[11:17] find some shirts will show that cast a
[11:20] lot more. If I set it to 50, it gives me
[11:22] enough room to play with uh so that I
[11:25] don't have to adjust my key every time I
[11:28] change clothes and fire up the stream on
[11:30] the next day. Uh so with these settings,
[11:33] oh, we set ourselves I guess I hit the
[11:36] opacity here somehow. Uh with these
[11:38] settings, we have got a pretty good
[11:42] looking key here. Now, I mentioned at
[11:45] the beginning of this video that I was
[11:47] going to share with you a little cheat
[11:49] code. And here is what that cheat code
[11:52] is. We're going to go here and we're
[11:54] going to delete our chroma key. Uh in
[11:58] the latest version of my advanced masks
[12:00] plugin, version 1.5.0,
[12:02] I've added a chroma key. Uh we can find
[12:06] it by looking through alpha masks and
[12:09] the mask type will be chroma key. This
[12:12] algorithm is the same algorithm that the
[12:15] OBS team uses, but it's got a couple
[12:18] nice extras. Uh, the first of these,
[12:21] let's dial these all down. So, it's like
[12:23] we're starting from scratch again. Uh,
[12:25] the first of these is a double color
[12:27] select for our key color type. And what
[12:31] this lets us do, rather than having to
[12:33] try to pick out that middle green, we
[12:35] can pick the lightest green and the
[12:37] darkest green, which are much easier to
[12:40] see and identify. So, let's go ahead
[12:42] here. Move this. Oh, no. We'll use this
[12:45] window. Uh, we're going to go ahead and
[12:47] click select color and pick screen
[12:50] color. And the lightest color is going
[12:52] to be something right around here. So,
[12:54] we'll select that green and click okay.
[12:57] Uh, we'll then click select color for
[12:59] the dark one and pick screen color. And
[13:02] I'm going to go down here. This is by
[13:03] far the darkest green. Click okay. And
[13:07] now we can bring that similarity. And
[13:09] you see they disappeared at the same
[13:10] time at an even lower value of 44 here.
[13:14] So it was able to pick that a little bit
[13:16] better than I could by eye. Our
[13:19] smoothness value would probably be the
[13:21] same as would our spill reduction. And
[13:25] here we have another really good looking
[13:28] key uh picked out much easier because
[13:30] you're able to pick those two colors.
[13:33] The advanced mask chroma key also comes
[13:35] with a show mat option. Uh this makes it
[13:39] easy to identify. You can see I've got
[13:41] some some little noise going on in my
[13:43] shoulder here which tells me that my
[13:45] smoothness might be a little high. So
[13:47] maybe we'll bring that down to eight.
[13:49] And you can really start to finetune. I
[13:52] mean, I might have a good enough key
[13:53] here that I can go without any. You can
[13:55] really start to finetune your key with a
[13:57] mat. It's much easier to see in this
[13:59] black and white format. Uh, the other
[14:02] thing that we can do with advanced mask
[14:04] to make your key even better, I've added
[14:07] a feather mask option. So, you'd want to
[14:09] add another advanced mask filter right
[14:12] after your chroma key filter. And you'll
[14:15] go down and you'll your alpha mask will
[14:17] be a feather mask. And now a feather
[14:20] mask is going to blur the edges of the
[14:23] mask. So if I crank it way up here, I
[14:25] look like a ghost or something. But if I
[14:27] set my feather to like two or three
[14:29] pixels, it's just going to add that
[14:32] little bit of extra smoothing to the
[14:36] edges of the subject. And that adds just
[14:38] a little bit more realism to your chroma
[14:41] key.
[14:43] For those of you who made it this far,
[14:45] congratulations.
[14:47] I hope I provided you with some new
[14:49] knowledge that'll help make your green
[14:51] screen look incredible. By using
[14:54] reasonable lighting, a flat green
[14:56] screen, and understanding the chroma key
[14:58] settings in OBS, you have one of the
[15:01] fundamental building blocks to create
[15:04] amazing real-time special effects for
[15:06] your stream. If you found this useful,
[15:09] please hit the subscribe button as I'll
[15:11] be adding plenty more tutorials in the
[15:13] future including
[15:17] how to drop a TV on your head.
[15:20] Also, please stop by my live stream
[15:22] where we build these effects as well as
[15:25] the software that's used to drive them.
[15:28] And I'll see you in the next one.
[15:32] [Music]
⚡ Saved you 0h 15m reading this? Transcribe any YouTube video for free — no signup needed.