Rebranding My VTuber Model: From Cthulhu to IRL
36sPersonal transformation stories and behind-the-scenes of VTuber creation are highly engaging for fans of the niche.
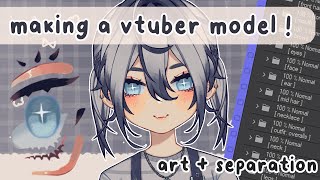
▶ Play ClipThe video is a tutorial on creating a VTuber model from scratch, covering character design, art creation, and layer separation for rigging. The creator shares their personal rebranding journey from a themed character to a model based on their real self, emphasizing simplicity and personal resonance in design. The tutorial includes practical tips on canvas setup, sketching, and organizing layers for efficient rigging.
The creator rebrands from a themed character to a model based on their IRL self, focusing on simplicity and personal resonance.
Advises choosing a design you are comfortable with rather than trying to be overly unique, as that leads to dissatisfaction.
Recommends using a 4000x6000 pixel canvas at 300 DPI for high-resolution art that eases rigging.
Uses Clip Studio Paint with a symmetrical ruler on a folder to affect all layers, and toggles snapping for asymmetrical parts.
Starts with a full-body sketch to check proportions before adding clothes, and keeps a naked sketch underneath for future outfit changes.
Explains that more separation in art makes rigging easier and better, but depends on rigging style. Advises asking riggers for separation guidelines.
Mentions using clipping masks to hide the chin when the model looks up, and reverse clipping in Live2D.
Live2D only has additive and multiply layer modes besides normal, so adjust shading layers accordingly.
Keep layers neat, name them properly, indicate left/right from the model's perspective, and keep sketch layers for future adjustments.
"The title accurately describes the video's content—designing, drawing, and separating a VTuber model from scratch."
What canvas size and DPI does the creator recommend for drawing a VTuber model?
A 4000 by 6000 pixel canvas with minimum 300 DPI.
3:36
Which drawing software does the creator use?
Clip Studio Paint.
3:49
Why does the creator use a symmetrical ruler on a folder?
To ensure all layers within the folder are affected by the ruler.
3:51
Why does the creator start with a full-body sketch before adding clothes?
To check proportions and anatomy before adding clothes.
4:31
What are the two layer modes (besides normal) available in Live2D?
The additive layer and the multiply layer.
7:13
What is the purpose of using clipping masks for hiding the chin in Live2D?
To hide the chin when the model looks up, creating the illusion of looking up.
6:50
When indicating left and right in Live2D, whose perspective does it refer to?
The left and right of the model's perspective.
8:53
Why should you keep your sketch layers after separating?
To make it easier to make adjustments or add toggles later.
9:07
Design for Yourself
Emphasizes that creators should choose a design they are comfortable with rather than trying to be overly unique, which leads to dissatisfaction.
1:59Canvas Size Recommendation
Provides specific technical advice (4000x6000 pixels at 300 DPI) for high-resolution art that eases the rigging process.
3:36Full Body Sketch First
Recommends sketching the full body before adding clothes to ensure correct proportions, a fundamental step for model design.
4:31Clipping Masks for Chin
Explains a clever Live2D technique using clipping masks to hide the chin when the model looks up, enhancing the illusion of movement.
6:50Layer Organization
Stresses the importance of keeping layers neat and named properly, which is crucial for efficient rigging and future edits.
8:30[00:00] foreign
[00:02] [Music]
[00:11] [Music]
[00:17] everything I do to help my friends and
[00:20] help other people who might be
[00:22] interested for those who don't know I
[00:25] originally debuted as a YouTuber named
[00:27] tufufu about two years ago I made my own
[00:30] model I made my logo I made all my own
[00:32] assets but instead of leading towards
[00:35] being a more themed character I've been
[00:37] wanting to make my own model and brand
[00:39] myself more towards my IRL self
[00:43] and it's easy to draw so in this Rebrand
[00:46] series I'll be going over drawing my
[00:48] model art rigging making logo design
[00:50] graphics and other things that go into
[00:53] the whole entire thing obviously this
[00:55] specific video goes over all the model
[00:56] designs and art and uh as well as a
[00:59] little lore so if you're interested in
[01:01] seeing the rest of the process of me
[01:03] making my model and everything
[01:05] um please subscribe
[01:07] okay so first off is designing the
[01:10] character my new design is a lot more
[01:13] simple than my last Model and it's based
[01:15] off of me so it's pretty easy to figure
[01:17] out what I want the main look to be I
[01:19] did have some trial Doodles uh before my
[01:22] model which really these I had my color
[01:25] palette down I just had to figure out
[01:26] like the general look I wanted and even
[01:29] when I was drawing my model sketch I did
[01:31] go through some other hairstyle
[01:33] Renditions I decided just to keep all of
[01:34] them though and I'm gonna make toggles
[01:36] for each hairstyle what I thought the
[01:37] pigtails the best for my normal default
[01:40] overalls outfit so I kept them as the
[01:43] default look if you helped figure out a
[01:44] design I would first go for an aesthetic
[01:46] you personally like
[01:47] whether it's pink and cute or like
[01:50] creepy and dark or clean and simple or
[01:54] super complex and you're like a myriad
[01:57] of a million animals
[01:59] my rule of thumb is to go for a design
[02:01] you're comfortable with and that really
[02:02] resonates with you I know a lot of
[02:04] YouTubers struggle with trying to make
[02:06] it super complex super unique design
[02:08] since there's so many other YouTubers
[02:10] out there they want to stand out if you
[02:13] go down that route you'll honestly never
[02:14] be happy with your design and you'll
[02:16] keep wanting changes so I would say just
[02:18] go for a general Vibe you like that you
[02:20] can brand yourself around
[02:21] and I'll make a video of me making some
[02:24] different toggles for different outfits
[02:25] and looks and stuff anyway so watch out
[02:28] for that
[02:31] you can also use your lore to help with
[02:33] your entire look if you want this is my
[02:36] previous feature model was Cthulhu
[02:37] inspired I incorporate it into my
[02:40] current model star
[02:41] IRL I actually had open heart surgery
[02:43] when I was a kid so I'm making mine more
[02:45] as if I sealed away to Fufu within me
[02:48] and I have this big old scar from it
[02:51] which I basically did anyway
[02:54] I'm super into a cultish stuff sort of
[02:57] like that so it all fit pretty well
[02:59] obviously you can't see the scar with
[03:01] this outfit but I'm planning on making
[03:03] some cute concept art about it and
[03:04] putting into my refs now onto actually
[03:07] drawing and separating the model
[03:09] front-facing models are the standard
[03:12] obviously but you can make a
[03:13] three-fourths looking model as well but
[03:16] drawing separating and rigging a
[03:19] three-fourths model is a lot tougher to
[03:21] do so I would not recommend it unless
[03:24] you really want to put all that work in
[03:26] front facing models they're perfect to
[03:28] use as a simple ref whenever you're
[03:30] requesting art or doing anything like
[03:32] that make sure your canvas is pretty big
[03:36] too I typically start with a 4 000 by
[03:40] 6000 pixel canvas with minimum 300 DPI
[03:45] makes the art a good resolution easy to
[03:47] work with and like today personally I
[03:49] use clip Studio paint and I use a
[03:51] symmetrical ruler on a folder so that
[03:53] all the layers within the folder are
[03:55] affected by the symmetrical ruler then I
[03:57] make sure I have all my snapping options
[04:00] visible on my brushes that I use so I
[04:02] can turn them off and on when the
[04:05] snapping is turned on it actually
[04:06] follows the ruler and then when it's
[04:07] turned off it doesn't so I can use that
[04:09] for unsymmetrical parts of the design do
[04:12] make sure that your symmetrical ruler
[04:14] and your respective program is right in
[04:16] the middle of the canvas
[04:18] I know some artists like they shrink
[04:19] their canvas after or remove the model
[04:22] around to fill the canvas into more but
[04:24] it does make the live 2D rigging process
[04:26] a little more painful and I am all about
[04:28] making things efficient and easy for me
[04:30] for sketching I always start off with a
[04:32] full body sketch to make sure all the
[04:34] proportions on the anatomy look right
[04:35] before I put on clothes it's also really
[04:38] helpful to have like a naked sketch
[04:42] underneath everything for when you want
[04:43] to do other outfits as well you can also
[04:46] do a half body model if you'd like I did
[04:48] start off with a half body model
[04:49] especially if you're using the free
[04:51] version of live 2D and you're limited in
[04:53] your warps it's a lot easier to do a
[04:55] half body or just draw a full body and
[04:58] just rig half of it then after I sketch
[05:01] out the body to what I think looks right
[05:03] I really hone in on the face since it's
[05:06] one of the main things you notice with
[05:08] the V2 Remodel and it's one of the more
[05:10] complex things to separate to make sure
[05:13] everything works well obviously usually
[05:15] I would recommend rendering your art
[05:18] more before actually separating
[05:20] everything personally I find that it
[05:22] keeps everything looking really cohesive
[05:24] especially if you have a really complex
[05:26] shading style or painterly style but
[05:29] ultimately it depends on your art style
[05:30] whether or not you want to okay now on
[05:33] to separating this will look a little
[05:36] different for everyone obviously
[05:38] depending if you're separating
[05:39] everything from the beginning or if
[05:41] you're separating everything from
[05:42] rendering your art already I'll be
[05:44] putting up little mini guides up on the
[05:46] screen that you can screenshot or pause
[05:48] if you want to see them this is all how
[05:51] I personally separate everything if you
[05:54] want less work on yourself you can
[05:56] simplify some of these if you want more
[05:58] work on yourself you can separate
[06:00] everything even more it just depends on
[06:03] how complex you want your rig to be
[06:05] usually the more separated your art is
[06:08] the easier and better it looks to rig
[06:10] but it also depends on your rigging
[06:13] style so if you're ever commissioning
[06:15] someone else to rig your model I would
[06:16] suggest asking them if they have
[06:19] guidelines on how to separate your art
[06:21] and everything because trust me it will
[06:24] save a lot of time and a lot of hassle
[06:27] for the rig artist I will be going over
[06:30] how to add toggles like outfits and like
[06:32] other emotions especially like animated
[06:35] crying or other things like that in
[06:37] another video there are some things you
[06:40] can add to make your rig more impressive
[06:43] that isn't necessarily all the art you
[06:46] see here such as clipping masks for
[06:50] hiding the chin you see this a lot with
[06:53] models that look up to hide that chain
[06:56] and to really get the illusion that
[06:58] they're actually looking up you can see
[07:00] there's a thing in live TV called
[07:02] reverse clipping where whatever your
[07:05] clipping will be opposite so instead of
[07:08] clipping onto something it will be
[07:10] clipped around it also keep in mind live
[07:13] TD currently only has two layer modes uh
[07:17] besides normal of course which is the
[07:20] additive layer and the multiply layer
[07:23] so if you have any color Dodge or use
[07:25] something else for shading and
[07:27] highlighting I would suggest fixing your
[07:30] layers to adjust to looking better on
[07:32] those modes another important thing are
[07:36] layers you wouldn't see from the front
[07:38] but you will see looking to the side for
[07:41] example a big one is hair if you only
[07:43] have your front hair in like one layer
[07:47] for the back hair it's gonna be a bit of
[07:50] a struggle to really get a clean angle
[07:54] when you're looking to the side also you
[07:57] want to keep in mind that you will need
[08:00] a lot of extra room on your layers when
[08:03] you're extending out your art knowing
[08:05] how to separate your art is really
[08:07] essential for a nice looking rig but
[08:09] sometimes you don't know what you need
[08:12] more of so when you actually get to
[08:13] rigging and you realize oh shoot I need
[08:17] to add more art onto this layer you can
[08:19] always just go back in and change it and
[08:21] then if you ever want to remake your
[08:22] entire model after learning how to
[08:25] separate better and how to rig better
[08:26] then your models will just keep getting
[08:28] better and better
[08:30] while you're separating everything make
[08:32] sure to keep all your layers nice and
[08:34] neat because there's going to be a lot
[08:35] of layers make sure you use folders make
[08:38] sure you name everything right name it
[08:41] properly but name it simple and then
[08:44] remember to indicate which side is on
[08:47] the left and right side of the model
[08:48] when you're in live to D and you're
[08:51] putting in your parameters and it says
[08:52] left and right it's going to be the left
[08:53] and right of the model's perspective
[08:56] so I usually like to use arrows to make
[08:58] it easier for myself
[09:00] and you're going to want to get rid of
[09:01] layers that you don't really need so
[09:03] anything just random or has nothing on
[09:06] it you're going to want to keep your
[09:07] sketch layers though especially if you
[09:09] have a full body sketch layer this makes
[09:11] it easier for if you want to make any
[09:13] adjustments to anything or if you have
[09:15] an outfit or toggles you want to add on
[09:17] to it and then you should be able to rig
[09:20] everything hopefully in my next video I
[09:23] will be using live to eat the rig just
[09:25] the head for the next video and then
[09:27] I'll do the rest of the body and
[09:28] everything in other videos I'm hoping
[09:31] it'll be a quick enough video I like my
[09:35] rigs to look nice but I like to do them
[09:37] quickly and efficiently so I have a lot
[09:39] of tips and tricks for people who might
[09:41] need them and it will be mostly for
[09:44] beginners but you might learn something
[09:45] if you actually know stuff already so
[09:48] I'll see you next time in the next video
[09:51] oh my goodbye good goodbye guys thanks
[09:55] for watching my first YouTube video
[09:59] [Music]
⚡ Saved you time reading this? Transcribe any YouTube video for free — no signup needed.