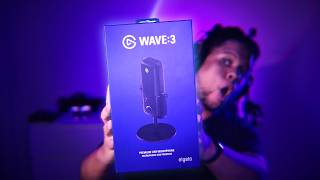

I'm Finally Upgrading My Mic Setup!
45sCreates anticipation and relatability for viewers considering a microphone upgrade.
▶ Play Clip"Delivers a solid setup guide, but the 'last mic you'll ever need' claim is subjective and slightly oversold."
The video is a hands-on setup and review of the Elgato Wave 3 mk2 microphone, where the creator upgrades from a previous Wave model. They walk through the unboxing, software configuration in Wavelink, and customization of effects like noise suppression, compressor, and EQ to achieve a clean sound without post-processing. The creator emphasizes simplicity and shares their personal setup choices, such as using the chat mix and avoiding audio splitting.
The creator is upgrading from the Wave XLR and Wave mic to the new Wave 3, expecting a simpler setup due to software and hardware updates.
The box includes the microphone, a stand (which they won't use), a USB-C cable, a USB-C to USB-A adapter, and a quick start guide.
They download Wavelink software and begin setup, but skip the traditional guided setup to avoid unwanted configurations like headset plug-in.
Tapping the microphone mutes it, indicated by a red light, a convenient feature for quick muting.
The mic has built-in effects (shown as three stars) that can be controlled, and they plan to reduce OBS effects in favor of these.
They discuss output volume and headphone monitoring, but skip audio splitting to keep setup simple.
The mic can automatically detect speaking volume and set gain accordingly, a feature they love.
Gain lock prevents accidental changes to the gate, ensuring consistent audio.
They select the 'chat' mix in Wavelink to keep audio routing simple, avoiding complex splits.
They lower gain and adjust effects like noise suppression to minimize AC noise, compressor for consistency, and EQ for tone.
The built-in EQ offers a radio-style boost, which they like, and they prefer mids.
The setup sounds good without post-processing, saving time in OBS and Premiere, and works well in Discord and Zoom.
Elgato simplifies the mic setup process, making it a one-time configuration that doesn't need constant tweaking.
They only need to launch Wavelink each time; the mic handles the rest, with voice tune accessible via the button.
The Elgato Wave 3 mk2 delivers a high-quality, simple audio solution with built-in effects that eliminate the need for post-processing, making it an ideal choice for creators seeking a hassle-free setup.
What is the tap-to-mute feature on the Elgato Wave 3 mk2?
Tapping the microphone mutes it, indicated by a red light.
02:19
What does the auto gain feature do?
It automatically detects your speaking volume and sets the gain accordingly.
03:31
Why did the creator choose the 'chat' mix?
To keep audio routing simple and avoid complex splits.
04:17
What is the purpose of gain lock?
It prevents accidental changes to the gate, ensuring consistent audio.
04:03
What built-in effects does the Wave 3 mk2 have?
Noise suppression, compressor, EQ, and voice tune.
04:45
Auto Gain Feature
Automatically sets gain based on speaking volume, simplifying setup.
03:31No Post-Processing Needed
The mic's built-in effects eliminate the need for external post-processing, saving time.
06:16Elgato's Simplification
Elgato's approach to mic setup is to make it a one-time configuration, reducing ongoing tweaking.
06:49[00:00] Today's the day we're finally upgrading my audio setup to the brand new wave 3 I've been using the wave XLR and the wave for a couple of years now, that is and considering all the new updates
[00:14] to the software and the microphone, this should be a way simpler setup. already had all my stuff in OBS studio and it was completely fine for recording, so I kind of procrastinated.
[00:27] Until now that it's very, very hot outside here. without putting a bunch of post-processing when I'm editing. We got the USB port here and the headphone jack Place
[00:42] that there for now and see what else is in Oh it comes with a stand. But we're not going to use that because I have the Elgato low profile arm. There will be a link in the description that is an affiliate link
[00:57] finally we have the cable, my collection of USB-C cable is growing. Cable seems pretty long.
[01:09] And I'm guessing this is probably an adapter a USB, c to USB, a adapter. It's just one of those Mic adapters for for the different stands.
[01:21] That's another collection I have of those. So basically you can put it at the bottom here Also a quick start guide. and that's pretty much it.
[01:33] Download the Wavelink software and plug it What it's already sounding like I am currently setting up the software,
[01:50] So set up your wave three Mk2. that I'm probably not going to follow because I don't want to have, like
[02:02] the traditional setup, for example, I'm not going to plug in my headset Pretty important you want to do So if I tap it.
[02:19] Also you can see the light turned red when I. It's basically like a combination of effects built into the microphone.
[02:31] It shows you the little three stars and that's what you're controlling, basically. And I actually have some OBS effects here that I'm going to turn down a proper listen.
[02:46] This is what it sounds like. going to bump it up a little bit so you can really hear what I'm saying. yes, you're hearing my AC that is on full blast right now.
[03:01] So what. Just output volume. That's also has to do with the headphones. So this is the part that I don't do because I'm not going to split my audio.
[03:17] And I also want my entire setup to be as simple as possible. to be dependent on the software. Position your mic this distance away.
[03:31] Ideally you want to talk towards the towards the mic. that's another feature that I really love, is that it can set it automatically. And it's basically going to detect the volume at which I speak normally.
[03:48] basically which gain I should be setting the mic to in general. Isn't that then we have the gain lock option. will not be able to modify the gate and basically mess up your Try
[04:03] And we are ready. went into mixes and make sure that this was working. If the first time you installed it, you don't see this moving, it's
[04:17] That's what I had to now it's moving so it's active. you want to make sure In your mic properties you have one of those mixes. So here you see how it says personal mix stream mix chat mix
[04:32] mix if you want to do the same setup as me, that I'll actually choose chat I'm sure I'm not going to add any other audio to now we can go back to gather wave three and we can play around with all of that.
[04:45] I also lowered the gain because don't know, 17 was a lot, I'm going to go to the effects tab, and this is where I can really play around If I turn it off,
[05:00] then you start hearing that noise again, but I can turn it back on. I just need enough of it so that you don't hear my AC. and that's going to be pretty important when I'm moving around.
[05:18] 2in or 2cm, that my voice goes super low or anything like that. So compressor is going to help a A voice soon is also something that I can work on. It's giving me a lot more timber, I think.
[05:32] I don't really have any humming going on, at least not that I know of. Until we have something decent, really device you play around with everything?
[05:47] There's an equalizer also in there that you can click on the little and it's giving you that very boost, very radio type of EQ, which I don't mind.
[05:59] I do like my mids though, just like And when I say my setup will be simpler. This sounds good without any post-processing, I'm tired of adding effects in OBS studio and then going in premiere
[06:16] also when I'm using discord, just like I showed you, if you choose chat like that in Discord and Zoom and whatever you're as an old partner. before the official announcement to tell all the creators, hey,
[06:32] And everyone's mind was blown, including mine, because it really seems like Elgato really tries to make a mic. I don't know, they're really, really simplifying the whole process
[06:49] and then like setting it up once and never having to worry about it ever again. can do a bunch of stuff, especially if you have like
[07:01] a dual PC setup, splitting your audio and all that stuff. It's so complicated, I don't need my whole computer to be completely split and all that, but I do need my microphone to just sound good.
[07:13] Now all I have to do is turn on a wavelength every time I don't have to worry about it. As I said earlier, I think when you press on the button
[07:27] and it shows you the three little thingy things, I think that's the voice tune. And if I yes, you can see it moving on the software, that's pretty cool. I don't know how strong I want it to be, this is pretty nice.
[07:40] If I'm speaking directly into it, it probably sounds way clearer now. I just had it on the side because I wanted to show off with the camera, I guess. And I'm very, very, very grateful.
[07:53] Thank you for watching. Also, go follow me on Twitch.

⚡ Saved you 0h 08m reading this? Transcribe any YouTube video for free — no signup needed.